Among all vegetable crops, tomatoes are the most popular products. They are grown on all continents except the permafrost zones. Breeders are working on breeding frost and drought-resistant varieties, obtaining very large and small fruits, increasing yields. Since a tomato is a heat-loving vegetable, its cold-resistant varieties are most appreciated. One of these varieties is "Snowdrop", more about which - below.
Variety description
Tomato "Snowdrop" - early ripe cold-resistant variety, intended for cultivation in greenhouse conditions and open ground. The phase of full maturity of the fruits occurs in 80-90 days after planting in the ground. The plant is represented by a lightly branched tall bush (up to 120 cm). Stem - upright, flexible. The root system is rod-type, fragile, superficial and well-branched.
Did you know? Up until the end of the 18th century, tomato confusion reigned in American customs declarations. Some importers called these fruits berries, others - vegetables. The point in the tomato question put the Supreme Court, who decided to call tomatoes vegetables in declarations and berries - in botanical writings. The tax on the import of tomatoes decreased, as vegetables were taxed at a lower commission than berries.
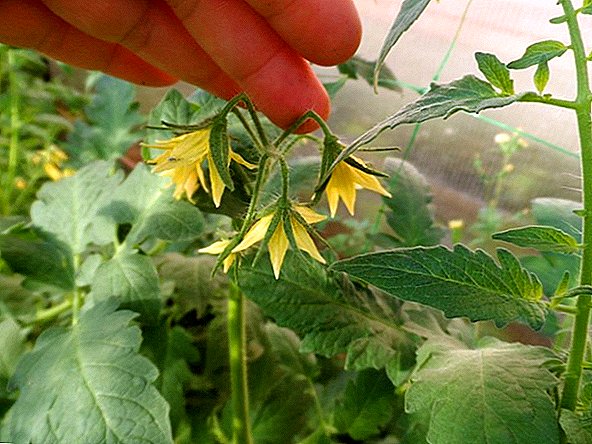
The aerial roots that form on the lower parts of the stem allow the plant to propagate by pinching. Leaves - large, carved, cut into unequal lobes. Snowdrop flowers have a pale yellow color, form a compact brush. Tomato is able to self-pollinate, therefore does not depend on pollination by insects.  The advantage of this variety over other types of tomatoes - record frost resistance and early ripening. Even in conditions of short daylight hours, the berries ripen on average within two months and can be harvested after the onset of the first cold weather.
Fruit characteristics and yield
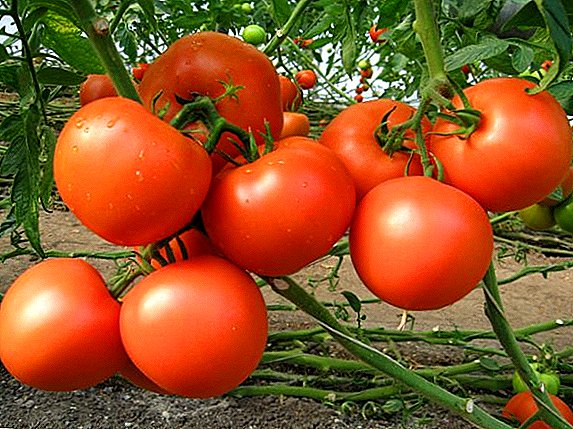
Juicy middle-sized berries have a rounded, slightly flattened shape, reaching 150 grams of weight. Tomatoes are sweet, with fine-grained pulp. Variety - consistently productive. Even in adverse conditions, it gives not less than 6 kg of fruits from 1 square. m landings. It can be used both for the fresh use, and for salting.
Selection of seedlings
When choosing a seedling, first of all pay attention to its age (optimally - 50-60 days). During this period, there are already 10–12 true leaves on the stem. The stem reaches a pencil thickness and a height of 35-40 cm. The root system must be well developed, with no visible damage.  Make sure that the seedlings that you buy were of the same height - such plants will develop harmoniously and give you a timely harvest.
Did you know? No one knows for sure where exactly tomatoes were first found. Approximate guesses of scientists converge on the territory of modern Chile. Almost on the very border of this country passes a thin strip of land. - coastal land on which this culture was grown by the indigenous population long before the colonization period.
Avoid seedlings that are sold in bundles. Most often, it has serious damage to shallow roots due to poor transportation and lack of moisture and takes a long time in open ground.
Before buying seedlings, inspect the underside of its leaves. It should be clean, without traces of powdery mildew and clutches of parasite eggs. The excessively saturated color of foliage and the tips wrapped down indicate excessive fertilizing with nitrogen fertilizers for the purpose of fast forcing - avoid such plants too. 
Soil and fertilizer
Best for growing tomatoes suitable loose fertile soil with a neutral pH, which well passes moisture and oxygen. Nettle, alfalfa and cucumbers are good precursors for tomatoes. It is not recommended to plant tomatoes where the nightshade grew - potatoes, tomatoes, eggplants, sweet peppers.
We advise you to consider the importance of soil acidity for plants, how to determine the acidity of the soil and how to deoxidize the soil.
Open field preparation begin immediately after harvesting the previous harvest. The soil needs to be cleared of weeds and residues of the leaf, dug to a depth of at least 50 cm and loosened. In the spring, the area designated for tomatoes should be treated with boiling water immediately after the snow has come off in order to destroy the larvae and eggs of the pests. For every square meter must leave at least 3 liters of boiling water.  To improve the composition of the soil, prepare a mixture of river sand and peat. Mix them in equal proportions. Spread the mixture evenly over the selected area (2 kg per 1 sq. M.) And seal it to a depth of 20-25 cm. Loosen the topsoil.
The harmonious development and high yield of tomatoes provide mineral and organic fertilizers. Before planting seedlings, handfuls of compost are brought into each well. The second feeding is done two weeks after disembarkation. Make a mineral mixture of 15 g of nitrogen, 25 g of potash and 60 g of phosphate fertilizers. Dilute the mixture in 10 liters of water - this volume is enough for 20-25 bushes.
To enrich the soil and nourish the plants, use organic fertilizers: straw, pigeon droppings, Florex granulated chicken droppings, bone meal, fish meal, whey, potato peel, compost, eggshell, banana peel fertilizer and tobacco dust.
The third feeding is carried out at the beginning of flowering with a weak solution of mullein (0.5 kg per 10 l). The fourth is carried out at the beginning of the fruiting period: for 10 liters of water, 20 g of superphosphate and 70 g of wood ash should be taken. 
Growing conditions
The area allocated for tomato beds should be warm, sheltered from the wind and well lit. Tomatoes are heat-loving plants, with a shortage of sunlight, they stretch and turn pale, and the yield is reduced.
You will be interested to know how to choose the optimal time for planting tomato seedlings.
The optimum temperature for adult seedlings ranges from + 23 ... +25 degrees. Temperatures below +10 and above +35 degrees are detrimental to the plant. Humidity during the period of cultivation and the formation of ovaries should be kept at a level of 50-60%, soil moisture - 70-80%. 
Growing from seed to seedlings at home
Buying seedlings on the market is a risky business. You can never be confident in the honesty of the seller and in what plant will grow on your garden. On the contrary, seedlings grown in the home, quickly take root in the open field, and you get exactly the fruits that are counting on.
Did you know? The largest fruits of giant tomato varieties weigh an average of eight hundred grams. The absolute record of the tomato contest belongs to an American by the name of McCoy. In 2015, a farmer from Minnesota managed to grow a fruit weighing 3.8 kg.
Seed preparation
To begin, select the best seeds from those you bought. Prepare a saline solution of 10 g of salt and 250 ml of warm water. Immerse the seed mass in it, stir and set aside for 10 minutes. Good seeds during this time will sink to the bottom, and low-quality seeds will float. Drain off excess solution and bad seeds, rinse off the good ones with salt under running water.
To disinfect the seeds and increase their resistance to bacterial and fungal diseases, pickle them for 15 minutes in a weak solution of potassium permanganate. Immediately after dressing, immerse them for a day in a nutrient medium to increase the yield. You can use special store solutions, potassium humate solution or potato juice as a medium.  Soaking the seeds of tomatoes in a solution of potassium permanganate To increase the germination of seed material, engage in its germination. Spread the seeds in a thin layer on a gauze cloth, move the cloth to a shallow dish and moisten with plenty of water. Germinate the seeds for three days, sprinkling the fabric with a spray bottle as it dries.
Important! Tomatoes do not tolerate clay soils and soil with high acidity. If the soil in your area is acidic, add 20 g of wood ash and 10 g of crushed chalk per kilogram of peat mixture.
The last procedure is hardening. It will prepare the seeds for low temperatures. Squeeze out excess moisture from gauze and put it together with the seeds in the fridge for 12 hours. Remove the seeds from the refrigerator and let them warm at room temperature for the next 12 hours. Repeat hardening three times.
Content and location
For the cultivation of tomato seedlings are best suited shallow (up to 10 cm) wooden boxes with holes in the bottom. Place the crates in shallow trays so that excess water flows into the soil particles. Fill the crates with a soil mixture for tomatoes.  You can buy it in special stores, or you can cook it yourself: take 2 parts of humus, 2 parts of peat and 1 part of river sand, mix them well and add 7 g of superphosphate and 10 g of wood ash for every 10 kg of the mixture.
Important! Many owners use plastic containers for growing seedlings. Such a container does not allow enough oxygen, the soil can choke and sour. Plastic can only be a tray for collecting water, for seedlings it is better to use wooden containers.
Seed planting process
Plant all of the seed at the same time to ensure the same conditions of development. Moisten the prepared soil, wait 15 minutes and cut the grooves centimeters in depth with a 4-row spacing. spray gun.  Cover the containers with a thick film, put them on a warm window-sill. Maintain the temperature within + 25 ... +28 degrees and humidity 75-80%. Every day, turn off the film for 5-7 minutes to wind the soil and reduce excessive moisture. If necessary, spray the soil from the spray gun to a state of light humidity. Seedlings will begin to spit on the 4-5 day after sowing.
Consider in more detail all the features of the germination of tomato seeds and their planting in the soil.
Seedling care
The main factor that ensures the health of seedlings is the abundance of light. If daylight hours are short in your area, install fluorescent lamps over the seedlings and provide them with twelve-hour lighting.
The first week, keep the seedlings in conditions of extreme humidity. Remove the film gradually, increasing the gap by 10-12 cm every day. Moisten the soil every other day, suck it up so that it does not dry out and not be swamped. Water the seedlings by the root method, sprinkling them will harm.  It is also unacceptable to overcool the seedlings. Maintain the temperature at + 18 ... +20 ° С and protect the shoots from drafts. Start fertilizing in 20 days after germination. Once a week, water the seedlings with a weak solution of guano or prepared organic fertilizer based on biohumus. The dosage indicated on the package, reduce by half.
Did you know? For the first time in Europe, tomatoes appeared with the light hand of the Portuguese in the 16th century. At first, the plant was considered poisonous, as attempts to eat tomato tops ended in food poisoning. The myth of the dangers of tomatoes was successfully destroyed only in 1822 by a brave American colonel named Johnson, who ate a bucket of these fruits in front of a crowded crowd.
Spend a pick on day 10 of cultivation. Seed sprouts in separate cups. Be careful - the earthen room should remain on the rhizome so that the plant is not injured during transplantation. Hardening start about two weeks after germination.  On the first sunny day, take the containers with seedlings to an open balcony or veranda and leave them for 5-7 minutes. Hardening is carried out gradually, increasing each day the duration of the "walk" by 10-15 minutes. Bring the tempering time to three hours per day.
Transplanting seedlings to ground
If you started to engage in sowing at the end of February, then you can plant seedlings in open ground in the twentieth of April. Prepare for planting the site break into squares with a side of 40 cm. In the corners of the squares, dig holes 10-12 cm deep. At the bottom of each hole, place a handful of humus and cover with warm water along the upper edges.
Important! Choose a cloudy and cool day for transplants. Seedlings planted in the heat, poorly rooted and, as a result, gives low yields.
Wait until the water is absorbed, repeat the watering. When the water is gone, transfer the seedlings to the wells, deepening the sprouts 3-4 centimeters above the root collar. Sprinkle the seedlings with soil, slightly tamp the ground. Pour 0.5 liters of warm water under the root of each bush. 
Agricultural technology of growing tomato seeds in the open ground
For those who have not found time to prepare the seedlings or have failed to grow healthy seedlings, the placement of tomato seeds in open ground is suitable.
Familiarize yourself with the following tomato cultivation methods: on the windowsill, in hydroponics, in the cochlea, according to the method of Maslov and Terekhins.
Outdoor conditions
Tomatoes "Snowdrop" - frost-resistant culture, which can be equally well contained in the greenhouse, and in open ground. In the greenhouse it is possible to illuminate the plants with fluorescent lamps, to maintain a constant temperature and humidity. Tomatoes growing in the open field are entirely dependent on weather conditions, so they need additional film cover in especially cold and rain.
The best site for growing tomatoes is sunny beds with loose fertile soil, protected from wind and drafts. The best choice will be the beds on which nothing has been cultivated for several years in a row. You can take the soil under which the perennial herbs, cucumbers, cabbage grew under tomatoes. 
The process of planting seeds in the ground
Before sowing the seeds in the ground, germinate them - this will reduce the period of spitting from 10 to 4 days. Soak them for 10-12 hours in growth stimulants, and then mix with clean river sand in a ratio of 1:10. Prepare the beds according to the above scheme. At the bottom of each hole, place a handful of humus and a teaspoon of wood ash, if you are not sure about the quality of the soil.
Did you know? At the end of the 17th century, George Washington’s personal chef named Bestley was bribed by the British government and tried to poison the president with a dish using tomatoes. Washington tasted the dish and noted its extraordinary taste, and the chef, inspired with success, immediately reported on the successful elimination of the president in a report to the commander of the English troops. The story became known to the public as the "Tomato Conspiracy" a few decades later.
Fill the wells with water to the brim, wait until the water is absorbed, and sow 3-4 seeds in each well. Cover the holes with earth, lightly tamp the soil and moisten it with a spray bottle. Planting seeds into the ground should be carried out at a stable daily average temperature of + 10 ° C. 
Watering
Tomatoes varieties "Snowdrop" need to be watered basal way. Watering spend as the drying of the soil, its top layer should be moderately wet. In wet rainy weather do not spend additional watering. With heavy rainfall cover the beds with a thick film.
Familiarize yourself with the advantages of using drip irrigation, as well as learn how to organize a system of drip irrigation at the dacha.
In hot weather, water the tomatoes every other day, certainly in the morning. Under each young bush of tomatoes 1.5-2 liters of water should go, and under an adult plant - 4-5 liters at a time. Take water for irrigation warm, with a temperature not lower than +20 degrees. 
Soil loosening and weeding
We conduct weeding simultaneously with loosening, since weeds are more easily pulled out of loosened soil. After weeding, apply the soil that has risen in place of the elongated weeds and slightly moisten it. Loosen every fifteen weeks the next day after rain or heavy watering. Loosening will slow down the evaporation of moisture from the soil and break the upper crust formed after watering.
Important! Loosen the soil to a depth of no more than 5 cm in young plants and 9 cm in grown bushes, so as not to damage the fragile root system.
Masking
This is the process of removing unproductive lateral shoots in the lower part of the bush. They need to be broken off manually, as soon as they reach a length of 5-6 cm. Spend staining in cool, cloudy weather or late in the evening, so that the plant has time to heal the scrap sites formed.
To increase the yield of tomatoes they need to stepchild. Read how to properly form tomato bushes in the open field and in the greenhouse.
The first procedure is carried out a month after sowing, then stepson bushes every 10 days. 
Garter
There are two types of supports for the garter: a trellis and stakes. Tapestries are a grid with large square cells. Garter to them requires considerable effort, as the trellis must be dug securely into the ground. At the same time, up to five bushes can be tied up to one trellis at a time. Garter stakes are dug one by one near each bush. Tie tomatoes need at the base of the fruit of the brush.
Top dressing
Tomatoes are quite sensitive to feeding, so they need to be fertilized regularly:
- spend the first feeding two weeks after the sprouting sprouts. Prepare a mixture of 10 liters of warm water, 1 kg of mullein and 15 g of superphosphate. Under each plant must go at least 0.5 liters of fertilizer;
- the second feeding needs to be done in another two weeks. Dissolve 20 g of superphosphate and 15 g of potassium chloride in 10 l of water and pour the bushes in the basal way. Under each bush - 0.5 liters of solution;
- spend the third feeding in twenty days. Under each bush pour a liter of a weak solution of mullein. If the bushes began to turn yellow leaves, add 15 g of ammonium nitrate to 10 liters of solution.
 Mullein solution In the period of ripening of the crop, it is better not to conduct top dressing, as fertilizers will begin to accumulate in the fruit.
Pests, diseases and prevention
In general, the Snowdrop tomatoes are resistant to infections, but sometimes they are affected by typical diseases for the Solanaceae: late blight, top rot, mosaic and bacterial diseases. You can get rid of fungal diseases with the help of fungicides, such as "Meteor", "Acidan", "Thiophene Extra".
Learn how to get rid of phytophthora and tomato top rot.
Bacterial diseases in tomatoes are not treated. If you notice traces of bacterial cancer on bushes, burn infected plants and regularly check healthy bushes for disease.  Bacterial cancer As for pests, thrips, whitefly, wireworms, slugs and a bear, destroying the root system of the shrubs, come to see the young shoots and fruits. The best way to combat these pests is prevention. Treat the soil with boiling water before planting tomatoes, release poultry to the beds.
Did you know? Up to the end of the 18th century, in Slavic countries, tomatoes were viewed with great suspicion. They were called rabid berries, psinkami, the fruits of sin. The writer and the botanist by the name of Bolotov, who paid great attention to these surprisingly useful berries, managed to change the attitude of the people towards tomatoes.
If pests do appear, carefully examine all the beds and collect them manually. Destroy pests and leaves with clutches of eggs and larvae. Treat plants with "Confidor", "Karate" or "Mospilan". Well frighten off the pests planted between tomato bushes marigolds and marigolds.  Marigolds planted with tomatoes
Harvesting and storage
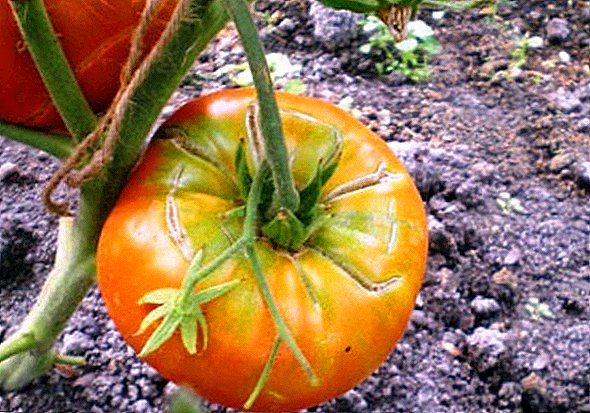
Tomatoes grade "Snowdrop" begin to ripen in late July or early August. If you want to eat ripe fruit immediately, collect those who have acquired a rich pinkish-red hue. Tear brown berries together with stalks for storage, and leave green tomatoes to ripen on the bushes. Fruit "Snowdrop" for 3-4 weeks, giving the crop as it ripens.
Important! If you keep ripe tomatoes in the fridge, they lose their fragrant substances and, as a result, become tasteless. The best place for short-term storage of these fruits. - kitchen table (no longer than 4 days). Make sure that the tomatoes during storage does not fall into direct sunlight.
Those fruits that you are going to store, do not need to be washed, just clean them with a soft cloth from soil residues and dust. In unwashed form, they will be stored better. Before storing the berries, inspect them for damage, mold and rot.  Put tomatoes in rows in wooden boxes lined with parchment or craft paper. Each new tomato layer is laid with a layer of paper. Pick up the cover so that it does not traumatize the fruit when closing.
Tomatoes at the stage of early maturity (brown), packaged in this way, can be stored for up to two months in a cool (not higher than 17 degrees) well-ventilated room. Neatly packed fruits at the stage of milk maturity (brown with green veins or green) can be stored for 4 to 6 months at a temperature of +2 and low humidity (up to 60%).
Three to four days before eating tomatoes, they should be brought into a warm room and left in a well-lit place for ripening. 
Possible problems and recommendations
- Leaf fall. The yellowing of the tips of the leaves, the wrapping of their edges and the subsequent falling off are due to lack of sunlight and excessive moisture. If your tomatoes have begun to fade and lose their foliage, turn on fluorescent lights (when kept in the greenhouse) or clear the vegetation around the beds to allow access to the sun's rays. Stop watering until the top layers of the soil are completely dry, and then moisten the soil as needed.
- Flower fall. Occurs with sharp drops in day and night temperatures. The plant does not cope with stress and loses flower brushes. Problems will be solved by mulching the soil. The mulch will prevent sudden evaporation of moisture during the day and warm the plant's root system at night.
- Cracks on the skin of the fruit. It is distinguished by thin brown-brown cracks running from the stem over the entire skin of the fruit. The reason is the accelerated growth of berries in the period of drought or abundant watering of plants after a hot day. To prevent the occurrence of cracks, water the plants as the top layers of the soil dry and do not allow it to dry out.
- Fruit fall. Occurs during the period of dairy maturity of the fruit. The cause is top rot, which first affects the connection of the fetus with the stem, and then the pulp of the fruit at the apex. To stop the spread of this problem, reduce the excess watering, because it provokes the rotting of the fetus.


Important! Timely weeding of tomato bushes will help to avoid the appearance of the whitefly and the spider mite. To finally get rid of these pests, clean the bushes from the leaves damaged by them and treat the plants with acaricides.Tomatoes variety "Snowdrop" - plants with high yields, giving juicy medium-sized fruits. This is a hardy frost-resistant variety that will give you tasty fruits if you take good care of it.